Gorgeous Lavender & Tan Houndstooth Freehand Manicure

Image

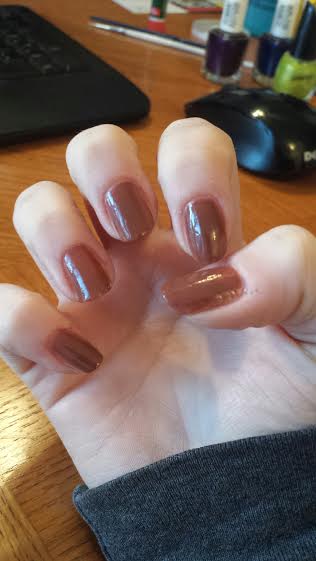
One day last week, I was stuck in a creative rut. I had naked nails and no ideas to paint on them. So, I put out a poll on my Facebook page asking all of my beautiful friends (male and female alike) to let me know if there were any specific colors or art they would like to see me tutorial. Among several great ideas, my friend Nikki casually mentioned that she hasn’t seen much in the way of tan and lavender manicures in the nail world. After considerable thought (And a lot of internet research – She was right! There aren’t a lot of tan and lavender manicures!), I agreed, and proceeded to begin my search for the perfect tan to compliment my favorite lavender in my collection.

After many days and shopping trips, it was my boyfriend who spied her sitting on a shelf at Walgreens, of all places, and brought her to my attention. I knew she was the one. I snatched her right up and brought her home that moment. Once home, I had to get the gears turning somehow, so I browsed Pinterest for awhile to jog my creativity. I kept seeing a lot of houndstooth patterns popping up on coats and dresses. I absolutely LOVE houndstooth. It’s classy yet outgoing and always makes me feel important when I wear it. Aside from cheating with nail stickers, I could not figure out a way to pull it off freehand on my nails! After about an hour of looking at photos of this design and being frustrated because I could not come up with a way to get this design ON MY NAILS, I stumbled across an easy-to-achieve, basic, photo tutorial. I nearly cried. Then, I composed myself and immediately had to try it out.

For my ladies and gentlemen who are more in the basic stages of nail art, this is a moderately difficult design, and shaky hands are not going to do this mani any justice at all. I decided it was a good idea to drink a cup of Italian Blend Dark Roast coffee before I started to wake myself up. Halfway through the manicure, the caffeine jitters kicked in, and my non-dominant hand looks like I let my dog do my nails today, opposable thumbs or not. So be warned, you need to be calm and collected to pull this off. Here’s how I did it:

Supplies You’ll Need:

Trusty Base Coat
Lavender Base (I used Color Club’s “Lavendarling”)
A Gentle, Complimentary Tan (I used Essie’s “Sand Tropez”)
A Thin, Long Nail Brush, A Small Dotting Tool, or A Toothpick
A Piece of Scrap Paper
A Super Shiny Top Coat

How to Achieve the Look:

  • Start out with your base, as always. Once dry, apply a couple layers of your lavender to ensure maximum opacity. Color Club’s “Lavendarling” took 2 thick coats.

Image

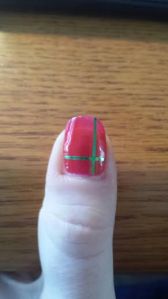
  • Once dry, use your tan to apply crosshatched stripes on each nail. Be careful to evenly space your stripes to ensure your squares are all equal size, and, well, square. Rectangular spaces will be harder to deal with. Depending on the length and width of your nails, you may need more or less stripes than pictured to make the squares all equal size.

Image

  • Once dry, remove the applicator from your lavender lacquer, use the sides of the bottle’s mouth to wipe off excess polish as best you can, and place it on a piece of scrap paper to the side. Then, take your long, thin nail brush, and dip it in the bottle. Wipe off excess polish on the sides and CAREFULLY apply tiny lines in the shape of a plus sign to one of the top corners of each purple square, with one side of each line disappearing into the purple square.

Image

Image

  • Once all your lines are drawn, use the same brush and connect the “Plus Sign” lines to the other side of the square using diagonal lines, and fill in the triangles. At this point, it’ll look like you have sideways, long, cat faces on your nails.

 Image

  • Once done, connect each square to the one next to it using a diagonal line from the top corner opposite the “cat ears” side to the bottom of the square next to it.

 Image

  • Apply your top coat once totally dry to avoid streaking.

Image

Voila! You now have a totally classy hound’s-tooth manicure! I’ve had a couple people ask me if they were stickers and were surprised when I told them I freehanded the design. Be sure to share your versions in the comments and, as always, Happy Lacquering!

XOXOXO – Amanda

Rainbow Interlocking Dotticure

Image

What Up, Yo!? Sorry, I’ve been watching a lot of Breaking Bad and Aaron Paul’s character, Jesse, is rubbing off on me. Anyway. It’s been awhile! But now that the holidays are winding down (FINALLY!!!), I have time to focus here. Since the winter months are such a depressing time for me, I thought I’d bring some color into our lives to spruce the place up.

I live just south of Chicago, and we don’t know the meaning of the word “mild” when it comes to weather. It’s like Extreme Olympics for the four seasons around here. Spring is too wet (and confuses itself with Winter by snowing until June), Summer is too hot, Fall just doesn’t even know who she is half the time, and Winter is too cold. I can deal with the spring’s rain and summer’s heat and fall’s confusion because it feels alive. Color explodes everywhere. The air crackles with energy and, on warmer days, men with nice arms walk around with no shirts on. But then comes Winter. It looms ominously over the Midwest, teasing us. You can almost feel it hanging in the air. Then, without any warning, you wake up one morning to find that the temperature plummeted to 10 degrees and frickin’ Snowpocalypse happened while you were sleeping. You didn’t even have time to exchange your summer outfits for winter ones and you end up spending a few days running your errands in sweatpants, hoodies, toe socks and flip flops until you can bust out your warm stuff (I can feel you judging me). The worst part, thought, is it’s so drab and dreary and devoid of color outside. It blows my mind that spring and summer and fall are such colorful seasons and, once winter rolls around, it’s like a giant black hole rips open somewhere in the universe and sucks the color and warmth and happiness right out of everything. As a human, I’ve learned to somewhat adapt to this lifeless, bland season by wearing bright colors and giving myself bright, cheery manicures that help chase and keep those Winter blues away.

The following manicure looks a lot harder than it really is. The completed product is actually on my nails, but the tutorial was done on swatch sticks since I forgot to take photos as I went. Using this design has always been a win/win for me. On one hand, people think I have pretty badass skills (I’ve never had anyone ask me where I get my nails done more often than when I’m rocking this look), while, on the other, this manicure literally took me 20 minutes and half of my attention while I watched Orange is the New Black. While I hate to give up my secrets, anyone can go online and Google a tutorial on how to create this look… But you’re here because I’m clever and witty as well as informational. Hopefully.

Here’s What You’ll Need:

Your handy-dandy Base Coat
Five colors of your choice (I used Pink, Orange, Green, Blue, and Purple)
A medium-Sized Dotting Tool
A Small-Sized Dotting Tool
Scrap Paper
A Top Coat

How to Achieve the Look (The explanation will be according to the photos, but feel free to choose your own colors):

Start by applying your top coat.

  • Once dry, take your first color and apply it to the outside half of your thumbnail. Then, take your second color and apply it to the inside half of your thumbnail and to the half of your pointer finger closest to your thumb. Then, take your third color and apply it to the other half of your pointer finger and to the half of your middle finger closest to your pointer finger, and so on, until you repeat the first color you used on the outside half of your pinky finger. It sounds confusing to read, but check out the photo below and look at the finished product and you’ll see what I’m talking about.

Image

  • Once all your colors are applied and dry, apply a few drops of your first color (Green in the photos) to a piece of scrap paper. Then, use your medium-sized dotting tool to make a row of dots on the line, equally spaced apart, inside the color (Blue in the photos) opposite the color you’re using.

Image

  • Next, apply a few drops of your second color (Blue in the photos) to a piece of scrap paper and use your medium-sized dotting tool to place dots on the opposite side of the line and on either side of the first dots you placed. That creates your interlocking dots look. Repeat with each color on each nail until all of your nails have interlocking dots on them.

Image

  • On each nail, use your small-sized dotting tool to place small dots on each nail uniformly to fill in the design.

Image

Image

Image

  • Wait until your nails are fully dry to avoid smearing and streaking and apply your top coat.

Voila! You have a manicure that looks intricate and difficult but is really simple to pull off. It also helps splash a little color into your life, should you need it. Enjoy your gorgeous rainbows, and make sure you show me your versions in the comments section!

Image

Until next time… Stay warm and colorful, my pretties!!!

XOXOXO – Amanda

Santa Manicure – Twist on a French with Bonus Accent Nail!

Complete

And, now, for my final Holiday shenanigan, enjoy a chunky, sparkly Santa twist on a French manicure with a bonus accent nail! Accent nails give a uniform, classy manicure a little sass. You’ll rarely see a self-post here that doesn’t include one. Come and get SPARKLY with me!

Supplies You’ll Need:

  • Base Coat
  • A Glittery Red Base Polish – I used Orly’s “On The List” (Fitting!)
  • A Chunky Red Glitter Top Coat – I used Sephora by O.P.I.’s “Be-Claus I Said So” (Also Fitting!)
  • An Opaque White Polish – I used O.P.I.’s “Alpine Snow” (I swear I didn’t mean it, guys…)
  • A Midnight Black Polish – I used Essie’s “Licorice”
  • A Silver Micro-Glitter Polish – I used a Silver Striping Polish (Stripe Rite Brand in Silver from Sally’s)
  • An Angled Nail Brush
  • 100% Pure Acetone Nail Polish Remover
  • (Optional) A Rubber Band, Hole Punch Stickers, Tape or whatever cheat you use for French Manicures
  • (Optional) A Striper Brush (For your silver micro-glitter polish If you don’t have striping polish)
  • A Medium-Large Dotting Tool
  • A Piece of Scrap Paper
  • An Ultra-Shiny Top Coat

How To Achieve The Look:

  • Base, Base, Base! It’s important to use it as reds normally stain pretty badly. Plus, it’ll help make removal a bit easier since we all know that chunky glitter is the Devil Reincarnate.
  • Apply two coats of your red base to just your tips on 8 of your fingers, and to one entire nail on each hand. I used my ring finger. Feel free to use whatever cheat you need to acquire a French tip. I prefer to freehand and then clean up edges with my Pure Acetone remover, but I’ve been doing this a long time and have a steady hand. I’ve heard that using Hole Punch Stickers work for a lot of people, and also a thick rubber band held tightly around the nail works too. Whatever floats your boat!

Step 1

  • Once your red base is dry, apply a generous chunky red glitter top coat layer over your red base only on all nails. Only one coat is needed if you have a glittery base. Too many layers can make the tips thicker than the rest of your nail which makes dry time ridiculous and also makes chipping your manicure a hell of a lot easier. Clean up any splodgy lines with your Pure Acetone Remover and an angled brush. Don’t worry about straight lines as you’ll be covering up the edges. Let dry completely. Add a thin layer of quick dry top coat if you want to speed things up.

Step 2

  • Once dry, place a few drops of white polish on a piece of scrap paper. Dip your dotting tool in the white and apply relatively-close-together dots on the line where your Red varnish ends on each nail. Your dots can be big or small. I prefer larger dots as they require less dotting movement, therefore there’s less room for error. Wait until completely dry and add a generous layer of an ultra-shiny top coat to those 8 nails.

Step 3

Now, we move onto your Santa accent nails! This is such a fun and easy way to showcase your skills! The best part is that it looks complicated, but it’s really so, so easy to achieve this look since they’re all straight lines! Let me show you how.

  • Drop a few more drops of white on your piece of scrap paper and use your dotting tool to place a column of white dots down the center of the nail. Let dry somewhat. While you wait, clean up your cuticle area with your angled brush and your Pure Acetone Polish Remover.

Step 4

  • Next, place a few drops of black on your piece of scrap paper. Use the same sized dotting tool, dip it into the black, and dot a straight line of dots perpendicular to the white stripe. Then, place two smaller dots in the white dots above the black dots for Santa’s buttons. Let fully dry. While you wait, clean up the sides of your nails with your angled brush and your Pure Acetone Polish Remover.

Step 5

  • Lastly, use your silver glitter striping polish or your silver glitter polish and your striping brush to draw a small square where the white and black stripes intersect for Santa’s buckle, and a small line inside the square on one side for the latch. Apply a few coats to make it really pop against all the other colors going on on this nail.

Step 6

  • Wait until fully dry and add a generous layer of ultra-shiny tops coat to make all the colors pop. Make sure your polish is fully dry or you’ll smear.

Complete

Voila! There you have a super sparkly Santa manicure! I hope everyone enjoys has fun showing off their cute, DIY Santa nails to their friends and family! Leave a comment with your version and let me know how many times your friends and family asked you, “Where did you get those done!!??”

See you all after the Holidays!

XOXOXO – Amanda-Claus

Totally Easy Gingerbread House Dotticure

I was sitting around trying to get in the Holiday spirit by Googling different Holiday things. I kept running across Gingerbread Houses, and it made me hungry. I wanted to eat them. But THEN! Thoughts of Sugarplums, Fairies and Dottis were dancing through my head! Why not paint them on my nails?! You too can have yummy nails by following this quick, easy guide!

unnamed Step 3

Supplies You’ll Need:
A Base Coat
A Spicy Brown – I used Revlon’s “Totally Toffee”
A Plain White – I used O.P.I.’s “Alpine Snow”
5 Rainbow Colors of your choice – I used green, orange, purple, blue, and red
Dotting tool – One medium sized head and one smaller sized head
A Top Coat

Achieve the Look:

  • Slather on that top coat. Once dry, add a few layers of your spicy tan/brown lacquer until opaque. Let dry.

unnamed (1)

  • Place a few drops of white on a piece of paper. Dip your medium-sized dotting tool into the white and dot several dots on the tips of two of your nails (I chose my thumb and pinky). Then, dot a row at the top near your cuticles on another nail and add some dots in a small design at the tip of the same nail (I chose my middle finger). Then, dot on the shape of a door on another nail (I chose my ring finger), and a window on your last nail (I chose my pointer finger). Be semi-generous with the amount of polish on the dotting tool. White doesn’t dot well, so sometimes you have to re-dot gently and layer the color. Let dry.

unnamed Step 2

  • Finally, place a few drops of your first color onto the paper. Use the dotting tool with the smaller head to carefully add dots of smaller sizes inside the white dots. This is your “candy”. Choose the order at random.

unnamed Step 3

  • Wait until COMPLETELY DRY (Between 30 minutes to an hour), and apply a generous top coat. Be careful to glide the brush over the color as opposed to paint it on as to not smudge or smear your dotticure.

Voila! There you have a yummy, sweet and super easy Gingerbread Dotticure! Share your versions in the comments section and, as always, let me know what else you’d like to see here at Lacq-Attacq!

Have a nomnomable day!!

XOXOXO – Amanda =)

Holiday Twist on a French Manicure

I was sitting at home at noon last Saturday and I was in a panic. My previous manicure had chipped and I had taken it all off earlier that morning. No biggie. But I had a birthday party to be at in 6 hours and not one idea for a new project. Not one. The longer I stared at my unpainted, plain nails, then stared at my collection, then stared back at them, the more panicky I got. This was an hour-long ordeal of heavy breathing, frustrated under-my-breath rants, and a borderline temper tantrum. I just couldn’t find my inspiration. I scoured Pinterest and Reddit (<~~~~ My Savior during my darkest times) but nothing seemed just right. I know the holidays are upon us, and while whimsical is not out of the question for me, I just wasn’t feeling it. I finally settled on a French as it was quick, easy, and classic.

Now, I’m not a fan of French Manicures. I think they are boring and uncreative. It screams “CONFORMIST!!!” to me. So I knew that it couldn’t just be any old French Mani. It had to have my signature twist but couldn’t take all afternoon due to my tight schedule. Therefore, I came up with this:

Image

Regardless of the fact that it took me 2.5 hours because SCREW YOU, TAPE, I actually loved it. It had a Holiday-esque feel to it but wasn’t over the top. Here’s how I achieved the look:

  • Start with a clear base coat. Let dry. (**DISCLAIMER: ALWAYS USE A BASE COAT. In fact, let that be Rule # 1 here at Lacq-Attacq. Base coats are your friend. Don’t forget that. Anyway. I stick with Essie’s All-In-One 3-Way Glaze. It never lets me down.)
  • Bust out your striping tape. If you don’t have striping tape, scotch tape or painter’s tape will work as well. You’re only using it as a border. Place the tape at a diagonal from a quarter of the way up your nail to just past the center of the edge of your nail. If you don’t go past the center of the edge, the silver won’t overlap. I applied a creamy, deep maroon – SinfulShine’s “Mirror Mirror” – carefully at just the edge. Slowly peel the striping tape off while the lacquer is still wet.(TIP: DO NOT WAIT until the paint dries or you’ll have goopy uneven lines, or worse, the polish will chip off with the tape. Noooooo!!!!
  • Usually, no matter what, you’ll have bleeds. Take an angled brush, dip it into a 100% pure acetone polish remover (My secret weapon is ULTA brand Maximum Strength 100% Pure Acetone Nail Polish Remover), and VERY CAREFULLY clean up any blotches or bleeds to straighten the line. You’ll have to wait until it’s dry to move on, or you can apply a Fast Dry Top Coat to move the process along a little faster. (**DISCLAIMER: Never use 100% Pure Acetone Polish Remover to remove polish from your whole nail. It is TERRIBLE for your skin, cuticles, and severely dries out and weakens your nails. ONLY use it for clean up. Removal of polish should only be done using a Non-Acetone or All-Natural Polish Remover!!!)
  • Once the first coat is dry, flip sides and do the same thing with the tape to the other side of your nail, adding another thin strip underneath the top strip to create that negative space, striping look. This is where striping tape comes in handy because manipulating scotch tape with wet nails can be very tricky. (TIP: When you’re placing tape over a color and not just a base, first place the tape on your arm or hand to make it a little less sticky. Super sticky tape will pull up your original color.) Choose your next color – I used Pure Ice “Silver Star” –  and apply it over the tape. BE CAREFUL not to go outside the tape when doing this side as cleaning up your edges with polish remover can ruin the color you already have down. Peel up the tape carefully but quickly before the polish starts to dry.
  • Again, take your angled brush and clean up any wonky lines or splotchy areas, careful not to erase the color that is underlapping the color you just applied.
  • Now you wait. If you apply your top coat too soon, you’ll smear everything. It’s important not to smear it as the detail on the striping is so intricate, one smear can ruin the whole nail. Once you’re sure it’s dry, go ahead and GENEROUSLY apply a top coat – I prefer Sally Hansen’s Insta-Dry Top Coat as my life is hectic and I almost always, inevitably, have to pee after I’m done painting my nails. (TIP: Your top coat should always be thick, and the brush should glide over your nail as opposed to applying any pressure and painting it on like you do with your colored varnish. This ensures less smearing when dealing with dotting, striping, or design.)

Voila! You’ve got yourself a classy yet festive Holiday manicure. Let me know what you think in the comments section, or feel free to shoot me a message if you have any questions or comments as well.

This has been a fun chat. Until next time, LacqAttacquers!

XOXOXO – Amanda

Whimsical Holiday Manicure

Whimsical Holiday Manicure

I’m not partial to the holidays. However, I had a holiday party to attend last weekend and since I opted out of the traditional dress-code (Read: Was too lazy to go out and look for a holiday-esque outfit), I decided to transfer festivity to my fingers instead. Here’s how I did it:

Supplies you’ll need:
Your Trusty Base Coat – I use Essie’s All-In-One 3-Way Glaze
A Bright, Festive Red – I used Wet n Wild’s “I Red a Good Book”
A Bright, Lime Green – I used Essie’s “The More The Merrier”
An Opaque, Thick White – I used Essie’s “Blanc”
A Glimmery Gold Glitter Polish (And a thin striping brush) or a Striping Polish in Gold (I used the Striping Polish)
A Chunky Gold Glitter – I used Sephora by O.P.I.’s “Only Gold for Me Top Coat”
Striping Tape (Or a metallic polish and a thin striping brush for your gift nail – I used green striping tape)
Scotch Tape
Scissors
An Angled Nail Art Brush
Pure Acetone Nail Polish Remover
(Optional) Nail Glue (I prefer Crazy Glue)
(Optional) Star Stud
(Optional) Small Tip Dotting Tool or a Toothpick

Steps to Achieve the Look:

  • Apply a base coat to protect your nails from stain. Then, apply your red varnish until fully opaque. Clean up any messy areas using a pure acetone polish remover and an angled nail art brush. Wait until fully dry or apply a thin coat of your fast-dry top coat to speed up the process.Start with whatever nail you choose to put your Christmas Tree. By the time you’re ready to add your final top coat once all your nails are completed, it’ll have had the most time to dry and you’ll encounter less chance of streaking. I chose my ring finger on each hand, but you can choose whichever finger appeals most to you.
  • Place two pieces of scotch or painter’s tape on either side of your nail in a triangle with the tip of the triangle at the top of your nail near the cuticles. That’ll make the shape of your tree. (Make sure you take some of the stickiness off of the tape by placing it on your hand or arm first or you’ll risk smudging or pulling up the red.)

Step 1 Tree

  • Then, bust out your striping tape (or cut thin strips of scotch tape) and apply it in zig-zags across the tree shape to form your “garland” outline.

Step 2 Tree

  • Once your tape is strategically placed, paint a thick coat of green over the tape.

Step 3 Tree

  • Then, lift the tape in the opposite order it was placed from the last piece of striping tape to the first piece of scotch tape. Do this quickly as you don’t want the green to smudge or flake.

unnamed

  • Choose your gift finger (I used my thumb as it was the largest) and apply either two strips of striping tape (or paint your metallic stripes) perpendicular to one another to create your gift ribbon. If you used striping tape, use nail clippers or cuticle cutters to trim the tape at the end of your nail to the exact length of your nail. Immediately paint on a thin coat of your top coat, and wrap it over and under the tip of your nail to seal in the tape and prevent it from coming up. If you used polish and a striping brush, skip that top coat part to avoid streaking and wait until dry.

Step 1 Gift
Step 2 Gift

  • Take your white polish and a small detail brush and carefully add the word “To:” to your gift. Move on to your next nail while you wait for the paint to dry.

Step 3 Gift

  • Choose a finger and use your striping polish or your striping brush and gold glitter polish to create glittery, gold snowflakes and some small dots surrounding the flakes.
  • Then, choose your last finger and apply a generous coat of your chunky gold glitter top coat.
  • Go back to your Christmas Tree finger and use your striping polish or your striping brush and your gold polish to apply small dots to your tree as ornaments. Then, either use your striping polish or your striping brush and gold polish to paint in a star to top your tree.

Step 5 Tree

  • OPTIONAL: I used Crazy Glue and a Gold Star stud instead as my tree-topper. Dot a small amount of Crazy Glue at the top of your tree. Dip the tip of your dotting tool or a toothpick into your top coat and use it to pick up your star stud. Place it carefully at the top of your tree, but don’t apply much pressure as it could cause the stud to slip and smear or smudge the tree and glue.

Step 6 Tree

  • Wait about a half an hour and apply a generous, thick top coat.

I left my middle finger nail free of design for simplicity, but feel free to add another design to keep the dream going.

Aaaaaand, there you have a whimsical, cute, holiday manicure to show off for the holidays! Please feel free to post your versions in the comments so I can see the adorable ideas you come up with!

Happy Holidays, Lacq-Attacquers!

XOXOXO – Amanda