I was sitting at home at noon last Saturday and I was in a panic. My previous manicure had chipped and I had taken it all off earlier that morning. No biggie. But I had a birthday party to be at in 6 hours and not one idea for a new project. Not one. The longer I stared at my unpainted, plain nails, then stared at my collection, then stared back at them, the more panicky I got. This was an hour-long ordeal of heavy breathing, frustrated under-my-breath rants, and a borderline temper tantrum. I just couldn’t find my inspiration. I scoured Pinterest and Reddit (<~~~~ My Savior during my darkest times) but nothing seemed just right. I know the holidays are upon us, and while whimsical is not out of the question for me, I just wasn’t feeling it. I finally settled on a French as it was quick, easy, and classic.
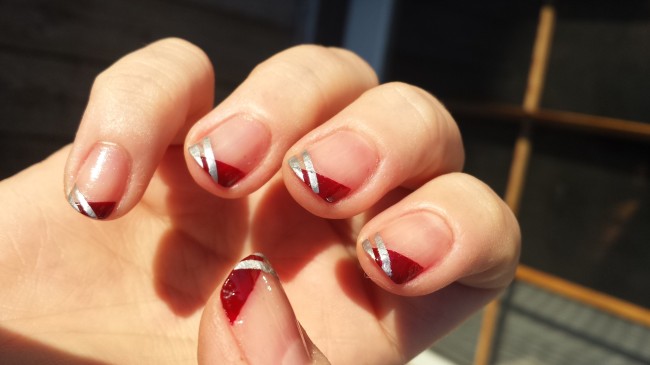
Now, I’m not a fan of French Manicures. I think they are boring and uncreative. It screams “CONFORMIST!!!” to me. So I knew that it couldn’t just be any old French Mani. It had to have my signature twist but couldn’t take all afternoon due to my tight schedule. Therefore, I came up with this:
Regardless of the fact that it took me 2.5 hours because SCREW YOU, TAPE, I actually loved it. It had a Holiday-esque feel to it but wasn’t over the top. Here’s how I achieved the look:
- Start with a clear base coat. Let dry. (**DISCLAIMER: ALWAYS USE A BASE COAT. In fact, let that be Rule # 1 here at Lacq-Attacq. Base coats are your friend. Don’t forget that. Anyway. I stick with Essie’s All-In-One 3-Way Glaze. It never lets me down.)
- Bust out your striping tape. If you don’t have striping tape, scotch tape or painter’s tape will work as well. You’re only using it as a border. Place the tape at a diagonal from a quarter of the way up your nail to just past the center of the edge of your nail. If you don’t go past the center of the edge, the silver won’t overlap. I applied a creamy, deep maroon – SinfulShine’s “Mirror Mirror” – carefully at just the edge. Slowly peel the striping tape off while the lacquer is still wet.(TIP: DO NOT WAIT until the paint dries or you’ll have goopy uneven lines, or worse, the polish will chip off with the tape. Noooooo!!!!
- Usually, no matter what, you’ll have bleeds. Take an angled brush, dip it into a 100% pure acetone polish remover (My secret weapon is ULTA brand Maximum Strength 100% Pure Acetone Nail Polish Remover), and VERY CAREFULLY clean up any blotches or bleeds to straighten the line. You’ll have to wait until it’s dry to move on, or you can apply a Fast Dry Top Coat to move the process along a little faster. (**DISCLAIMER: Never use 100% Pure Acetone Polish Remover to remove polish from your whole nail. It is TERRIBLE for your skin, cuticles, and severely dries out and weakens your nails. ONLY use it for clean up. Removal of polish should only be done using a Non-Acetone or All-Natural Polish Remover!!!)
- Once the first coat is dry, flip sides and do the same thing with the tape to the other side of your nail, adding another thin strip underneath the top strip to create that negative space, striping look. This is where striping tape comes in handy because manipulating scotch tape with wet nails can be very tricky. (TIP: When you’re placing tape over a color and not just a base, first place the tape on your arm or hand to make it a little less sticky. Super sticky tape will pull up your original color.) Choose your next color – I used Pure Ice “Silver Star” – and apply it over the tape. BE CAREFUL not to go outside the tape when doing this side as cleaning up your edges with polish remover can ruin the color you already have down. Peel up the tape carefully but quickly before the polish starts to dry.
- Again, take your angled brush and clean up any wonky lines or splotchy areas, careful not to erase the color that is underlapping the color you just applied.
- Now you wait. If you apply your top coat too soon, you’ll smear everything. It’s important not to smear it as the detail on the striping is so intricate, one smear can ruin the whole nail. Once you’re sure it’s dry, go ahead and GENEROUSLY apply a top coat – I prefer Sally Hansen’s Insta-Dry Top Coat as my life is hectic and I almost always, inevitably, have to pee after I’m done painting my nails. (TIP: Your top coat should always be thick, and the brush should glide over your nail as opposed to applying any pressure and painting it on like you do with your colored varnish. This ensures less smearing when dealing with dotting, striping, or design.)
Voila! You’ve got yourself a classy yet festive Holiday manicure. Let me know what you think in the comments section, or feel free to shoot me a message if you have any questions or comments as well.
This has been a fun chat. Until next time, LacqAttacquers!
XOXOXO – Amanda

