Santa Manicure – Twist on a French with Bonus Accent Nail!

Complete

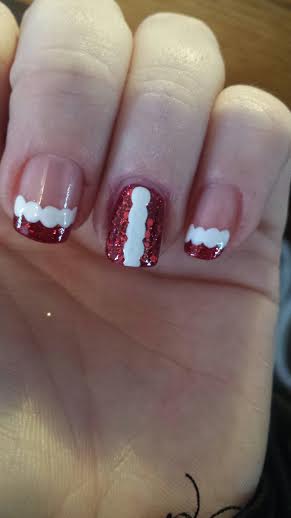
And, now, for my final Holiday shenanigan, enjoy a chunky, sparkly Santa twist on a French manicure with a bonus accent nail! Accent nails give a uniform, classy manicure a little sass. You’ll rarely see a self-post here that doesn’t include one. Come and get SPARKLY with me!

Supplies You’ll Need:

  • Base Coat
  • A Glittery Red Base Polish – I used Orly’s “On The List” (Fitting!)
  • A Chunky Red Glitter Top Coat – I used Sephora by O.P.I.’s “Be-Claus I Said So” (Also Fitting!)
  • An Opaque White Polish – I used O.P.I.’s “Alpine Snow” (I swear I didn’t mean it, guys…)
  • A Midnight Black Polish – I used Essie’s “Licorice”
  • A Silver Micro-Glitter Polish – I used a Silver Striping Polish (Stripe Rite Brand in Silver from Sally’s)
  • An Angled Nail Brush
  • 100% Pure Acetone Nail Polish Remover
  • (Optional) A Rubber Band, Hole Punch Stickers, Tape or whatever cheat you use for French Manicures
  • (Optional) A Striper Brush (For your silver micro-glitter polish If you don’t have striping polish)
  • A Medium-Large Dotting Tool
  • A Piece of Scrap Paper
  • An Ultra-Shiny Top Coat

How To Achieve The Look:

  • Base, Base, Base! It’s important to use it as reds normally stain pretty badly. Plus, it’ll help make removal a bit easier since we all know that chunky glitter is the Devil Reincarnate.
  • Apply two coats of your red base to just your tips on 8 of your fingers, and to one entire nail on each hand. I used my ring finger. Feel free to use whatever cheat you need to acquire a French tip. I prefer to freehand and then clean up edges with my Pure Acetone remover, but I’ve been doing this a long time and have a steady hand. I’ve heard that using Hole Punch Stickers work for a lot of people, and also a thick rubber band held tightly around the nail works too. Whatever floats your boat!

Step 1

  • Once your red base is dry, apply a generous chunky red glitter top coat layer over your red base only on all nails. Only one coat is needed if you have a glittery base. Too many layers can make the tips thicker than the rest of your nail which makes dry time ridiculous and also makes chipping your manicure a hell of a lot easier. Clean up any splodgy lines with your Pure Acetone Remover and an angled brush. Don’t worry about straight lines as you’ll be covering up the edges. Let dry completely. Add a thin layer of quick dry top coat if you want to speed things up.

Step 2

  • Once dry, place a few drops of white polish on a piece of scrap paper. Dip your dotting tool in the white and apply relatively-close-together dots on the line where your Red varnish ends on each nail. Your dots can be big or small. I prefer larger dots as they require less dotting movement, therefore there’s less room for error. Wait until completely dry and add a generous layer of an ultra-shiny top coat to those 8 nails.

Step 3

Now, we move onto your Santa accent nails! This is such a fun and easy way to showcase your skills! The best part is that it looks complicated, but it’s really so, so easy to achieve this look since they’re all straight lines! Let me show you how.

  • Drop a few more drops of white on your piece of scrap paper and use your dotting tool to place a column of white dots down the center of the nail. Let dry somewhat. While you wait, clean up your cuticle area with your angled brush and your Pure Acetone Polish Remover.

Step 4

  • Next, place a few drops of black on your piece of scrap paper. Use the same sized dotting tool, dip it into the black, and dot a straight line of dots perpendicular to the white stripe. Then, place two smaller dots in the white dots above the black dots for Santa’s buttons. Let fully dry. While you wait, clean up the sides of your nails with your angled brush and your Pure Acetone Polish Remover.

Step 5

  • Lastly, use your silver glitter striping polish or your silver glitter polish and your striping brush to draw a small square where the white and black stripes intersect for Santa’s buckle, and a small line inside the square on one side for the latch. Apply a few coats to make it really pop against all the other colors going on on this nail.

Step 6

  • Wait until fully dry and add a generous layer of ultra-shiny tops coat to make all the colors pop. Make sure your polish is fully dry or you’ll smear.

Complete

Voila! There you have a super sparkly Santa manicure! I hope everyone enjoys has fun showing off their cute, DIY Santa nails to their friends and family! Leave a comment with your version and let me know how many times your friends and family asked you, “Where did you get those done!!??”

See you all after the Holidays!

XOXOXO – Amanda-Claus

Whimsical Holiday Manicure

Whimsical Holiday Manicure

I’m not partial to the holidays. However, I had a holiday party to attend last weekend and since I opted out of the traditional dress-code (Read: Was too lazy to go out and look for a holiday-esque outfit), I decided to transfer festivity to my fingers instead. Here’s how I did it:

Supplies you’ll need:
Your Trusty Base Coat – I use Essie’s All-In-One 3-Way Glaze
A Bright, Festive Red – I used Wet n Wild’s “I Red a Good Book”
A Bright, Lime Green – I used Essie’s “The More The Merrier”
An Opaque, Thick White – I used Essie’s “Blanc”
A Glimmery Gold Glitter Polish (And a thin striping brush) or a Striping Polish in Gold (I used the Striping Polish)
A Chunky Gold Glitter – I used Sephora by O.P.I.’s “Only Gold for Me Top Coat”
Striping Tape (Or a metallic polish and a thin striping brush for your gift nail – I used green striping tape)
Scotch Tape
Scissors
An Angled Nail Art Brush
Pure Acetone Nail Polish Remover
(Optional) Nail Glue (I prefer Crazy Glue)
(Optional) Star Stud
(Optional) Small Tip Dotting Tool or a Toothpick

Steps to Achieve the Look:

  • Apply a base coat to protect your nails from stain. Then, apply your red varnish until fully opaque. Clean up any messy areas using a pure acetone polish remover and an angled nail art brush. Wait until fully dry or apply a thin coat of your fast-dry top coat to speed up the process.Start with whatever nail you choose to put your Christmas Tree. By the time you’re ready to add your final top coat once all your nails are completed, it’ll have had the most time to dry and you’ll encounter less chance of streaking. I chose my ring finger on each hand, but you can choose whichever finger appeals most to you.
  • Place two pieces of scotch or painter’s tape on either side of your nail in a triangle with the tip of the triangle at the top of your nail near the cuticles. That’ll make the shape of your tree. (Make sure you take some of the stickiness off of the tape by placing it on your hand or arm first or you’ll risk smudging or pulling up the red.)

Step 1 Tree

  • Then, bust out your striping tape (or cut thin strips of scotch tape) and apply it in zig-zags across the tree shape to form your “garland” outline.

Step 2 Tree

  • Once your tape is strategically placed, paint a thick coat of green over the tape.

Step 3 Tree

  • Then, lift the tape in the opposite order it was placed from the last piece of striping tape to the first piece of scotch tape. Do this quickly as you don’t want the green to smudge or flake.

unnamed

  • Choose your gift finger (I used my thumb as it was the largest) and apply either two strips of striping tape (or paint your metallic stripes) perpendicular to one another to create your gift ribbon. If you used striping tape, use nail clippers or cuticle cutters to trim the tape at the end of your nail to the exact length of your nail. Immediately paint on a thin coat of your top coat, and wrap it over and under the tip of your nail to seal in the tape and prevent it from coming up. If you used polish and a striping brush, skip that top coat part to avoid streaking and wait until dry.

Step 1 Gift
Step 2 Gift

  • Take your white polish and a small detail brush and carefully add the word “To:” to your gift. Move on to your next nail while you wait for the paint to dry.

Step 3 Gift

  • Choose a finger and use your striping polish or your striping brush and gold glitter polish to create glittery, gold snowflakes and some small dots surrounding the flakes.
  • Then, choose your last finger and apply a generous coat of your chunky gold glitter top coat.
  • Go back to your Christmas Tree finger and use your striping polish or your striping brush and your gold polish to apply small dots to your tree as ornaments. Then, either use your striping polish or your striping brush and gold polish to paint in a star to top your tree.

Step 5 Tree

  • OPTIONAL: I used Crazy Glue and a Gold Star stud instead as my tree-topper. Dot a small amount of Crazy Glue at the top of your tree. Dip the tip of your dotting tool or a toothpick into your top coat and use it to pick up your star stud. Place it carefully at the top of your tree, but don’t apply much pressure as it could cause the stud to slip and smear or smudge the tree and glue.

Step 6 Tree

  • Wait about a half an hour and apply a generous, thick top coat.

I left my middle finger nail free of design for simplicity, but feel free to add another design to keep the dream going.

Aaaaaand, there you have a whimsical, cute, holiday manicure to show off for the holidays! Please feel free to post your versions in the comments so I can see the adorable ideas you come up with!

Happy Holidays, Lacq-Attacquers!

XOXOXO – Amanda